How to use ClearCull
From memory card to a Lightroom Classic catalog of your best shots, in five steps. This guide walks through each one, including the plug-in that brings your picks into Lightroom at the end.
The idea in one minute
ClearCull looks at every photo of a shoot, groups the similar ones together (bursts, the same pose a few seconds apart), checks each face for sharpness and closed eyes, and gives every photo a colour:
- Green: pick. The best shot in its group. Goes to Lightroom flagged as Pick.
- Blue: similar. A good frame, but not the best one. Can go to Lightroom with a blue label, so it’s there if you change your mind.
- Red: reject. Blurred, eyes closed or badly exposed. Moved aside into a
_Rejectsfolder, never deleted.
You go through the groups, agree or change the colours with one key each, then approve. ClearCull hands the result to Lightroom Classic. Everything happens on your own PC; nothing is uploaded.
Install and activate
- Download ClearCull-win-Setup.exe and run it. It installs for you only (no administrator password) and adds ClearCull to the Start menu. The installer is signed by Polychrome Limited. If Windows still says “Windows protected your PC”, click More info, check the publisher is Polychrome Limited, then click Run anyway.
- The installer also puts the ClearCull plug-in into Lightroom Classic. If Lightroom is open, restart it so it notices the plug-in.
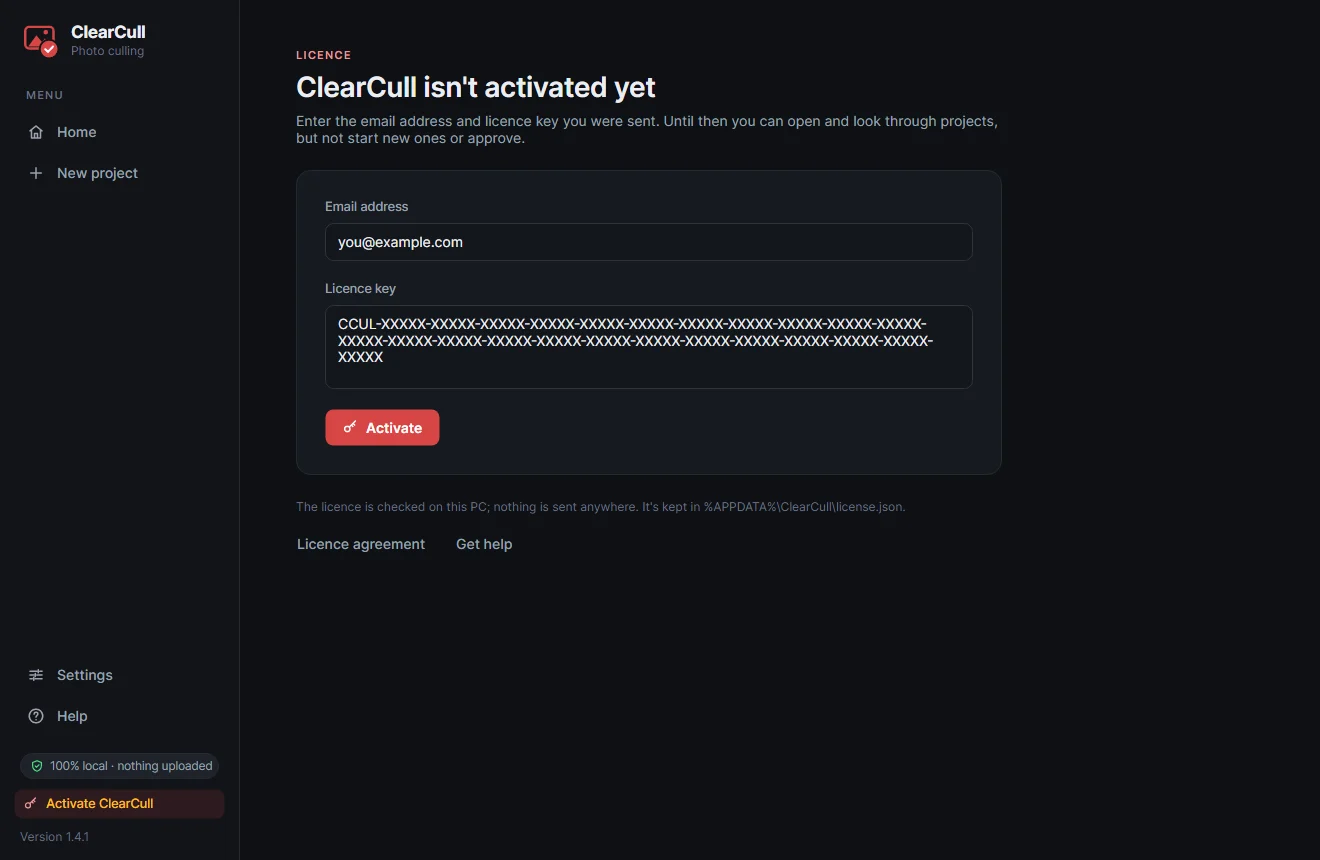
- Open ClearCull and click Activate ClearCull at the bottom left. Enter the email address your licence key was sent to and paste the key. It’s checked on your PC; nothing is sent anywhere. Without a licence you can look around and open projects, but not start new ones or approve. No key yet? Buy one in the store.
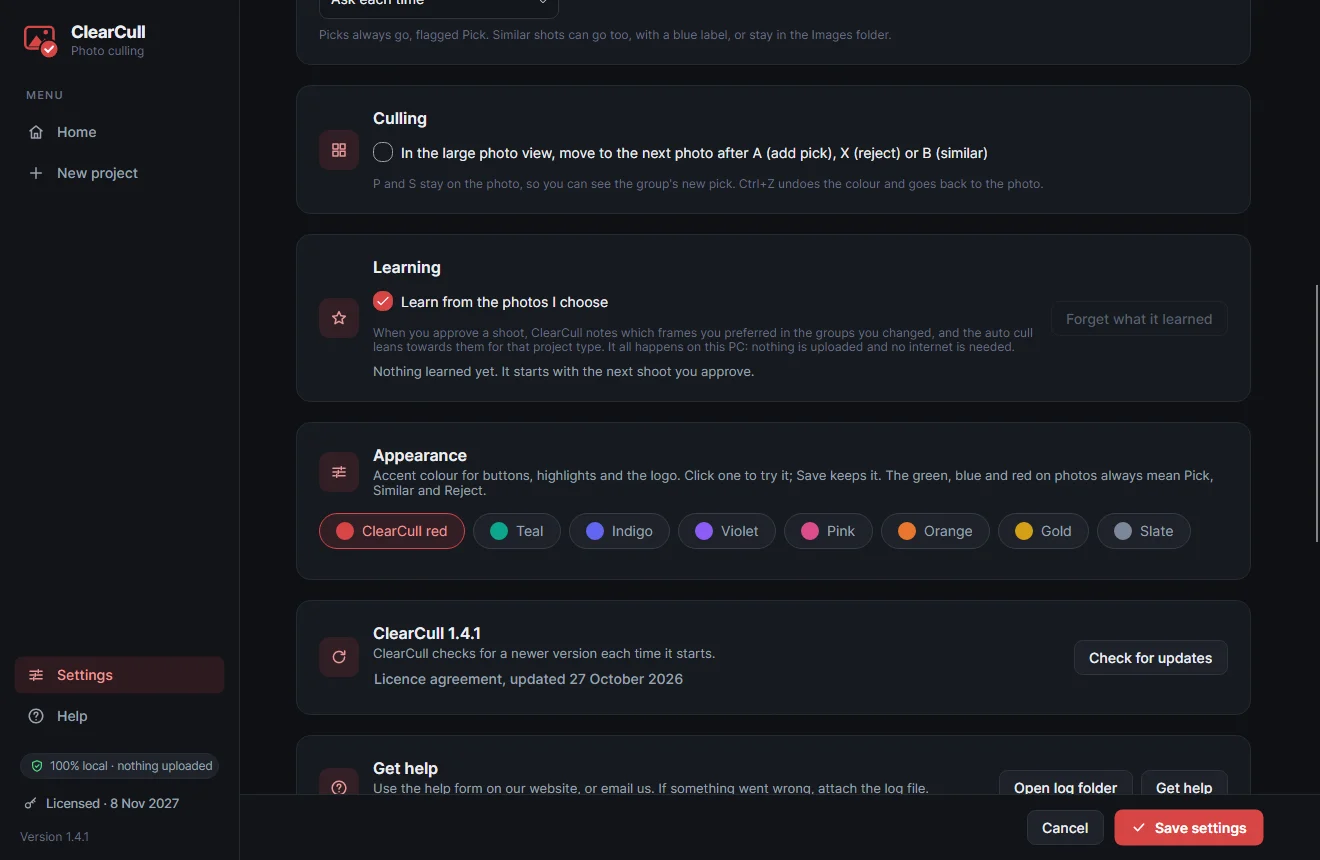
ClearCull checks for a newer version each time it starts and offers it in a banner at the top (Update now takes a minute and keeps your projects, settings and licence). You can also check any time: Settings ▸ Check for updates, on the card showing your version. The release notes list what’s new in each version.
Settings and Help (which opens this guide) are at the bottom of the left-hand menu.
One-time setup
Open Settings and fill in:
- Base folder: where your shoots live. Each project gets its own folder here, named with the date and shoot name (for example
2026-10-26 Ava & Liam Wedding), withImagesandCataloginside. - Template catalog: a blank Lightroom catalog that every project’s catalog is copied from. Make it once in Lightroom with File ▸ New Catalog… (call it something like “ClearCull Template”), set any catalog settings you always use, close it, then choose its
.lrcatfile here. - Lightroom.exe: found automatically if Lightroom Classic is installed in the usual place.
- Similar (blue) shots at approval: whether blue shots go to Lightroom too (with a blue label), stay out, or ClearCull asks each time.
- After Approve ▸ Open the picks in: Lightroom Classic (the usual), or Nothing if you’d rather Approve just moved the rejects aside and saved the list of picks, without making a Lightroom catalog.
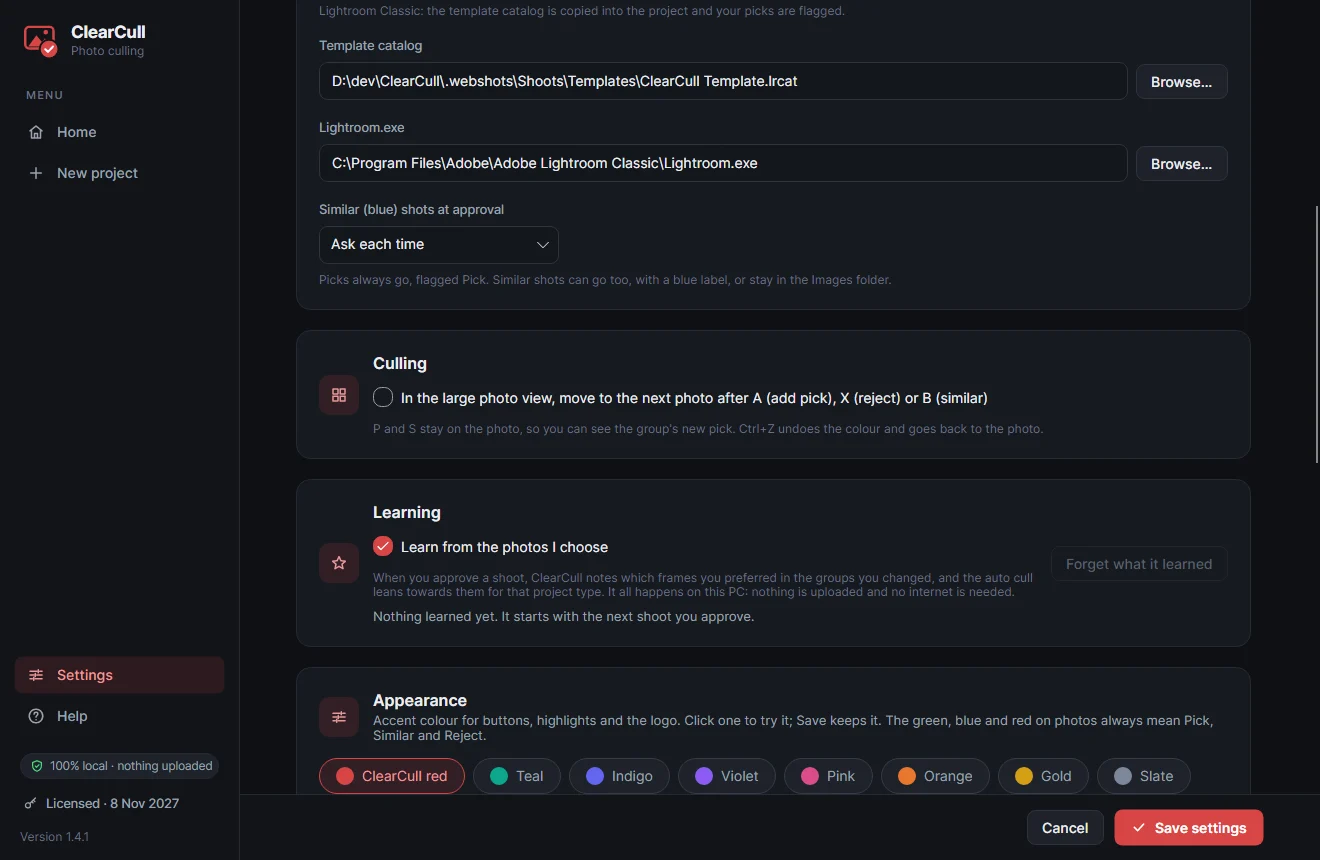
Further down are a few choices you can change whenever you like:
- Culling: tick it to move straight on to the next photo after A, X or B in the large view. P and S stay put so you can see the group’s new pick.
- Learning: ClearCull learns which frames you prefer (see below). Untick it to keep the standard ranking, or click Forget what it learned to start again.
- Appearance: the colour of buttons, highlights and the logo. Click one to try it, then Save settings. The green, blue and red on photos always mean pick, similar and reject, whatever you choose.
1. Start a project
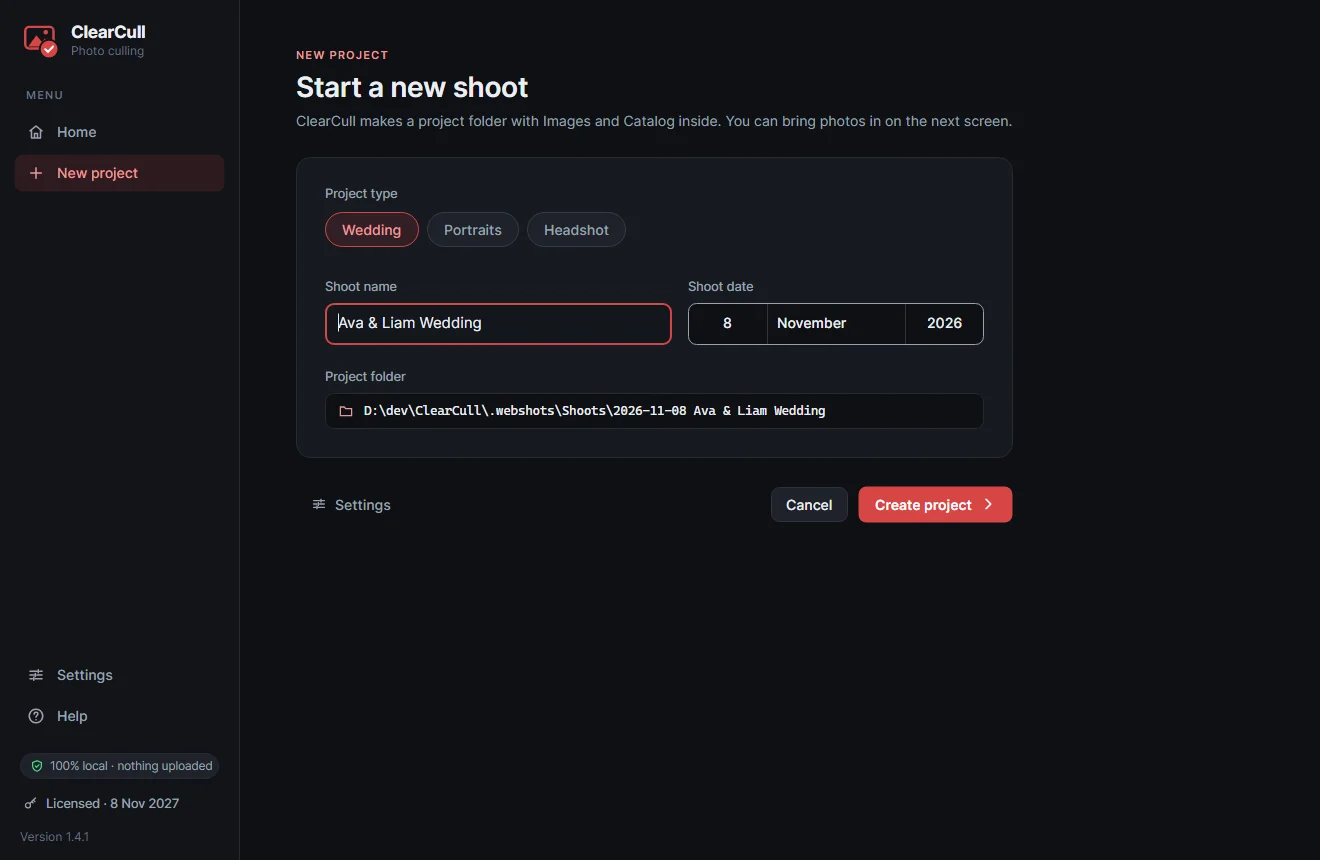
Click New project, choose the type of shoot, type its name and check the date. The folder it will make is shown underneath. Click Create project.
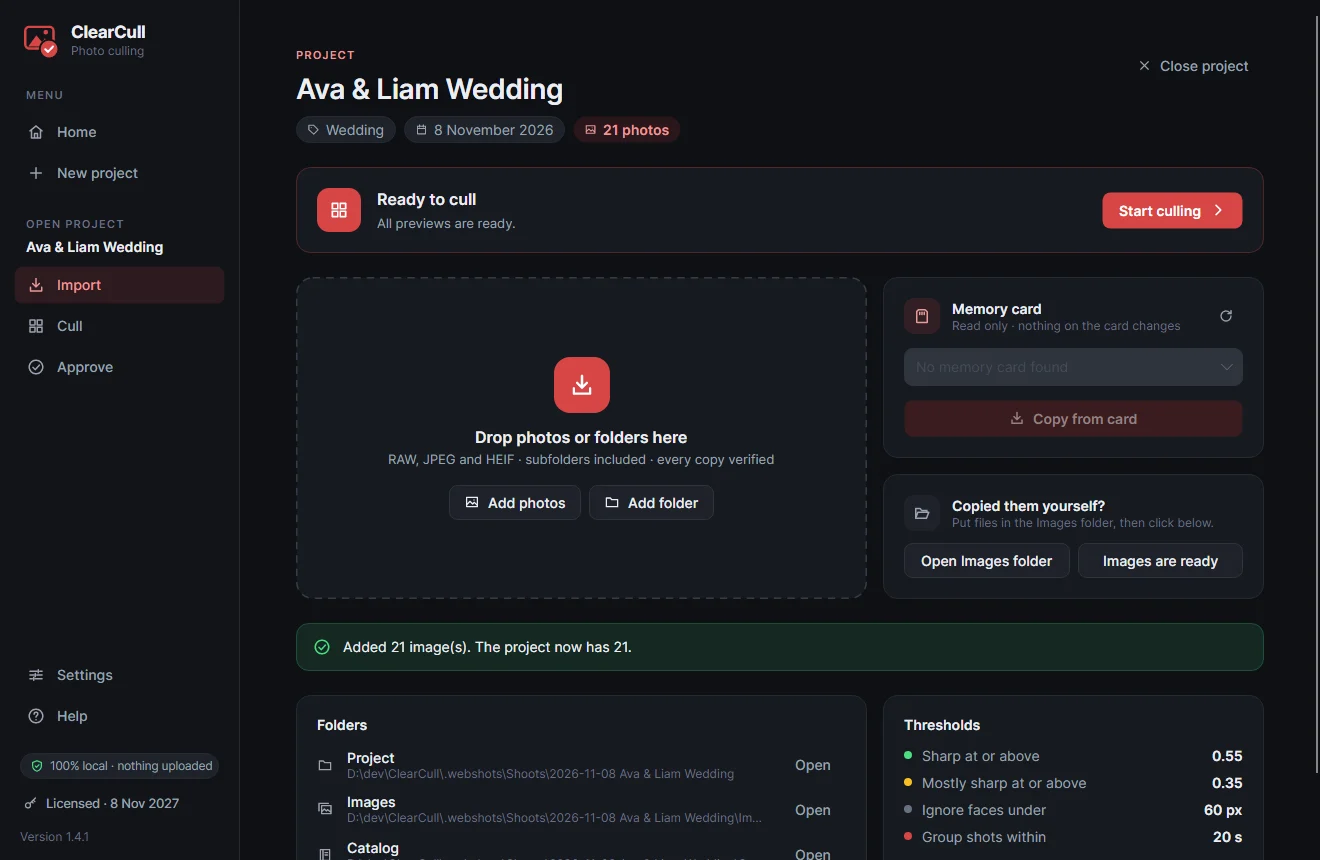
2. Bring the photos in
On the Import page, either:
- Drop photos or folders onto the big area (or use Add photos / Add folder),
- Copy from a memory card: choose the card and click Copy from card. Every file is checked after copying, and nothing on the card is changed, or
- if you’ve already copied the files into the project’s
Imagesfolder yourself, click Images are ready.
Duplicates are skipped, so copying the same card twice is safe. ClearCull reads Canon CR3, Sony ARW, Fujifilm RAF and JPEG files, using the preview built into each RAW file, so it’s quick.
Shooting RAW+JPEG? When a JPEG (or HEIF) has a RAW of the same name beside it, ClearCull copies both but culls only the RAW, so each moment is counted once and only the RAW goes to Lightroom. The JPEG stays with its RAW: if the RAW is rejected, its JPEG moves to _Rejects with it.
3. Cull
The Cull page shows your shoot as groups of similar shots, in the order they were taken. ClearCull has already coloured them (the auto cull): its colours show as outlined badges until you confirm or change them; your own choices show solid.
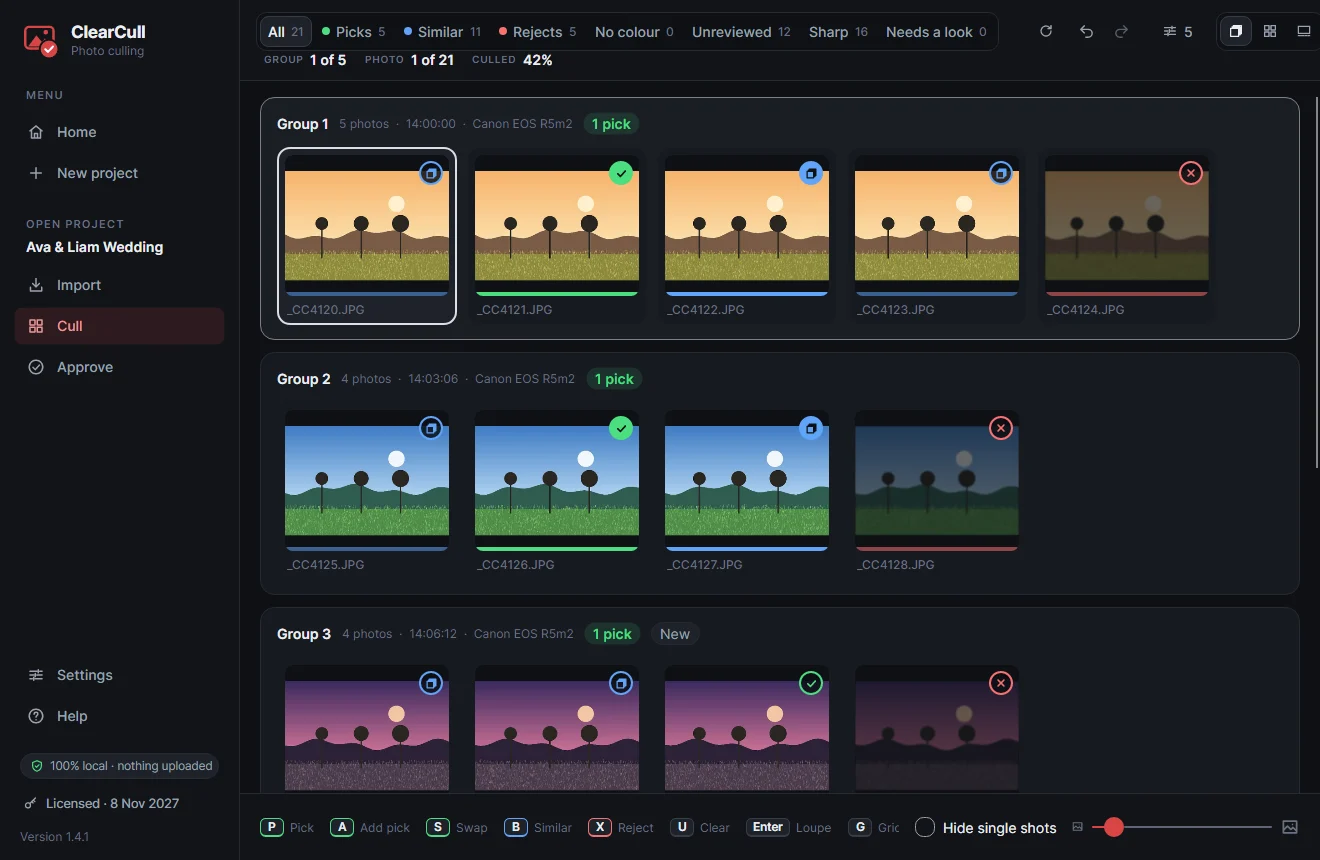
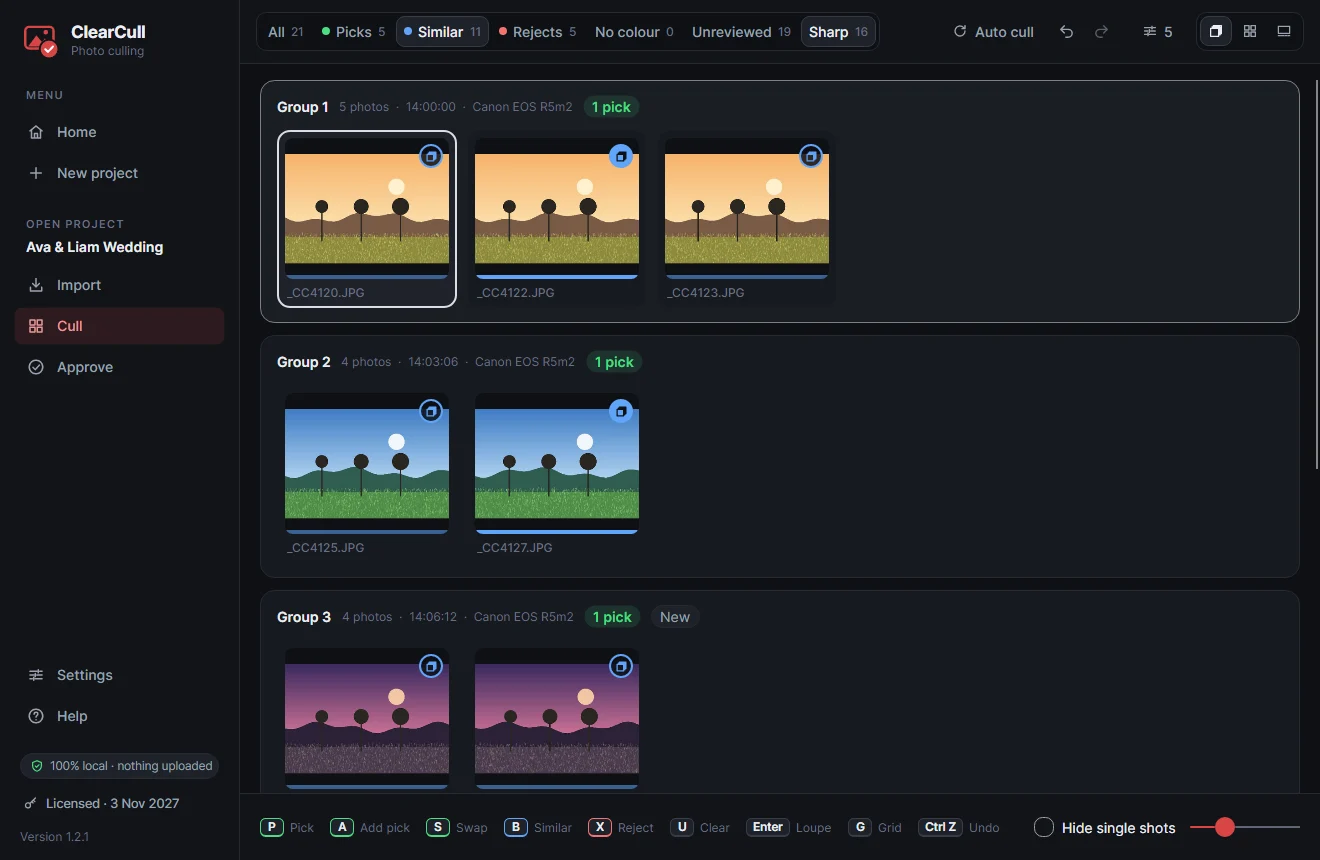
The filters along the top narrow down what you see, and you can turn on more than one (click a filter again to turn it off; All clears them):
- The colours add up: Picks and Similar together show everything green or blue.
- Unreviewed, Sharp and Needs a look narrow whatever else is on. Similar + Sharp, for example, shows only the sharp blue shots: handy for finding a better frame the auto cull passed over.
- Unreviewed means groups you haven’t been into yet: none of their photos opened large or coloured by you. Frames you judged in the strip under the large photo count, so a shoot you’ve gone through group by group has none left.
- Sharp means the faces are sharp (green rings), or, in a photo without faces, the frame itself is crisp.
- Needs a look shows the groups you haven’t touched where the auto cull rejected every frame, so you can check you’re not losing a moment. Its number counts groups and goes down as you give them colours of your own.
Along the top you can also see where you are: Group 393 of 1,468, Photo 2,345 of 7,786 (in the photos the filters show) and Culled, the share of the shoot in groups you’ve been into.
Work through it with the keyboard: → to the next photo, ↓ to the next group, and one key to set a colour (all the keys). The most useful ones:
- P makes the current photo the group’s pick.
- S swaps it with the current pick, when you prefer a different frame.
- X rejects it, B marks it similar, A adds a second pick.
- Ctrl Z undoes anything.
A quick routine for a big wedding, in the large view: check the group’s pick, look along the strip at the other frames, press Ctrl → to jump back to the pick for a last look, then ↓ to the next group. Shift X clears out a group of test shots in one go.
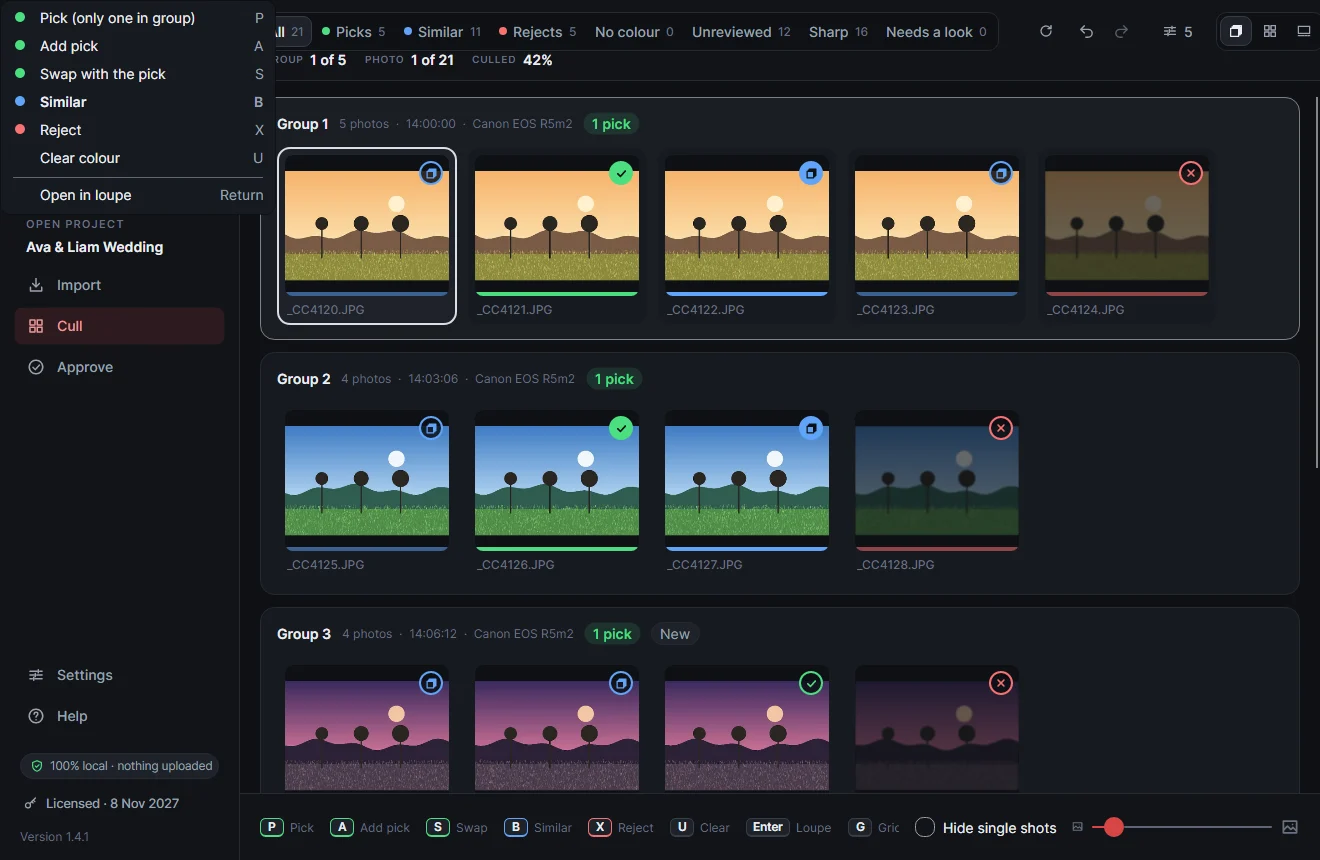
You can also right-click any photo for the same choices.
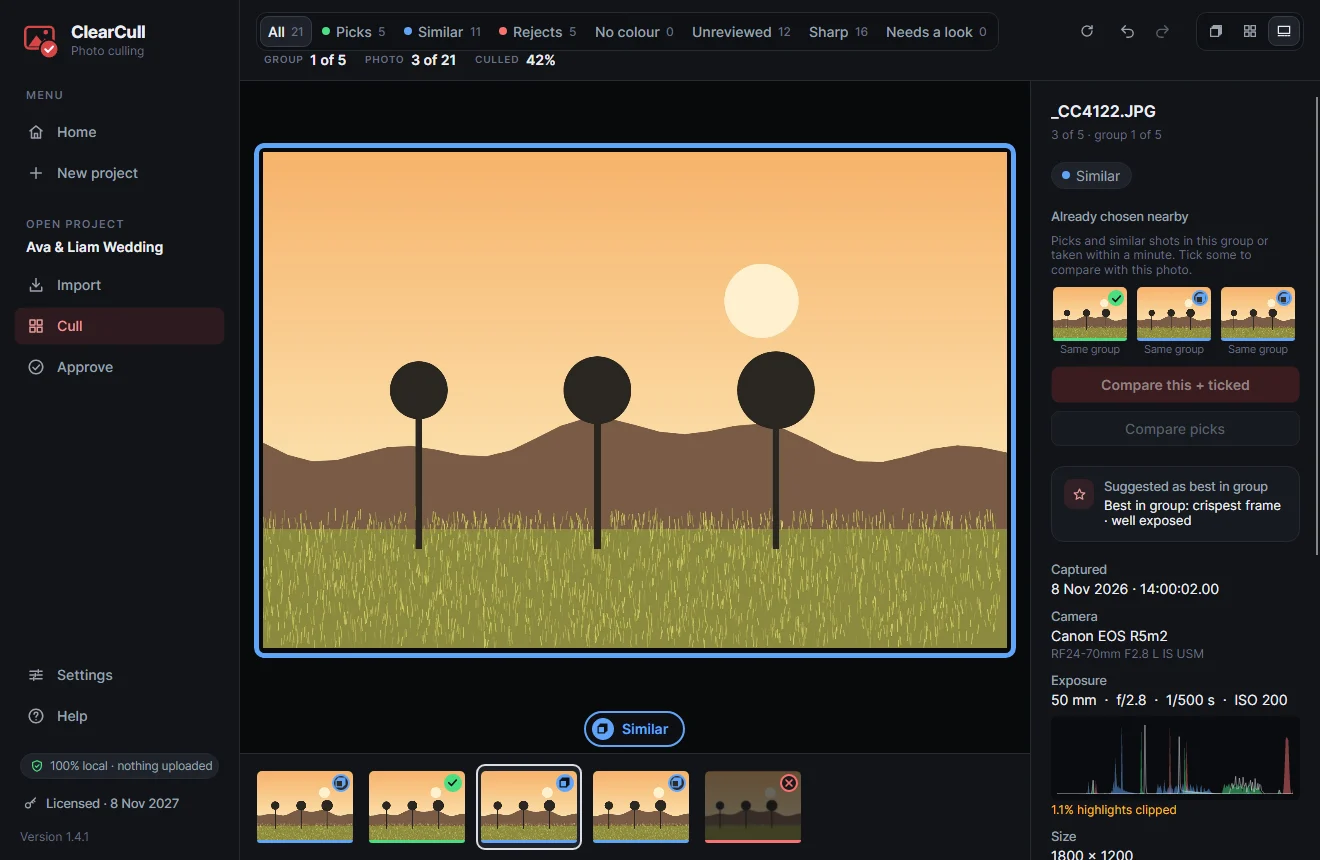
Press Enter to see a photo large. The side panel shows how ClearCull ranked it and why, each face with its sharpness, the camera settings and a histogram. The strip along the bottom is the rest of the group. Press Z (or click the photo) to check focus at 100%.
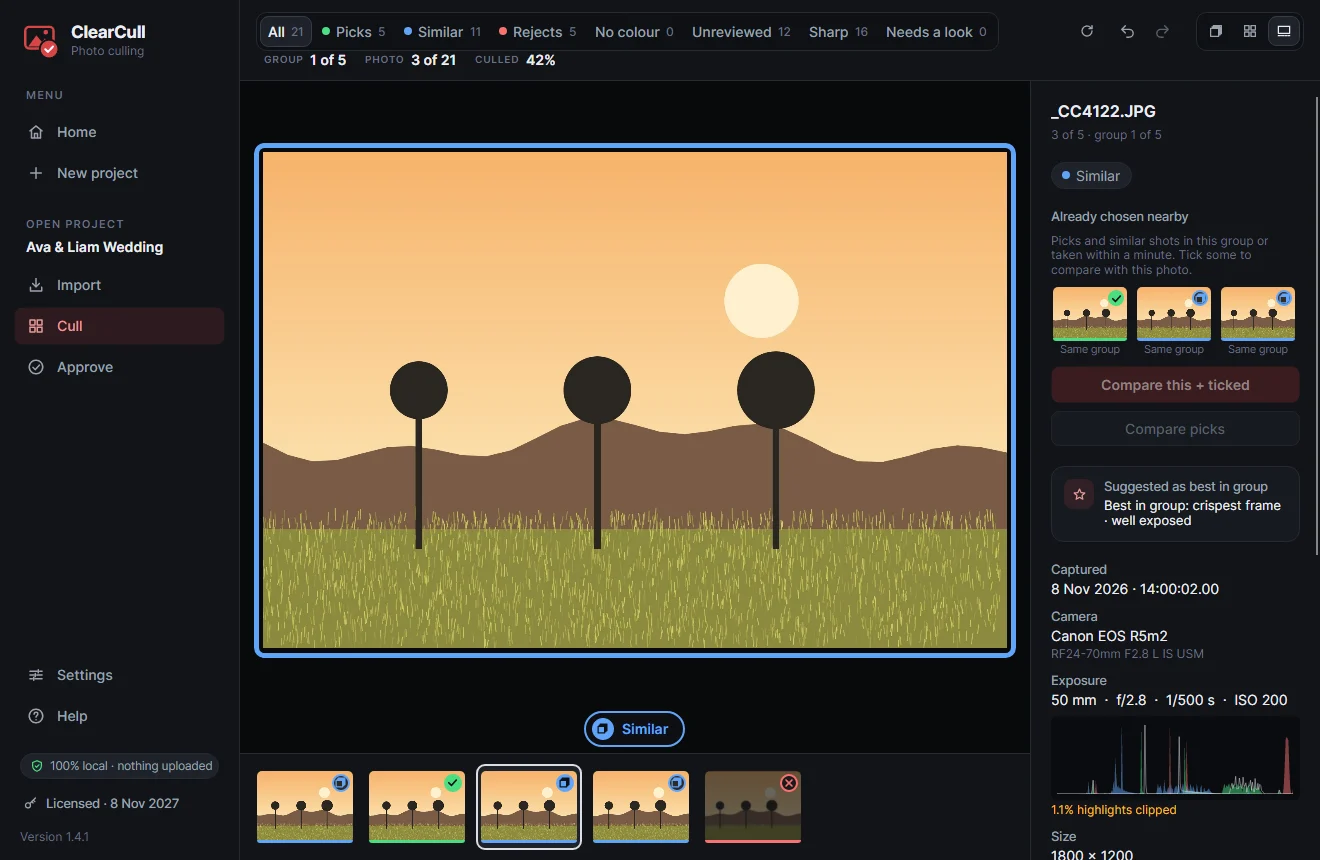
You can always tell what a photo is:
- A frame in its colour runs round the photo: dashed while it’s the auto cull’s colour, solid once it’s your choice.
- A label under the photo says its colour (Auto pick, Similar, Reject…). It grows for a moment when the photo opens or you change its colour, so a wrong key is noticed straight away, without covering the photo.
- The histogram under Exposure is made from the camera’s own preview, like the one on the back of the camera. An amber note warns when a noticeable part of the frame is blown out or blocked up (for example “2.1% highlights clipped”).
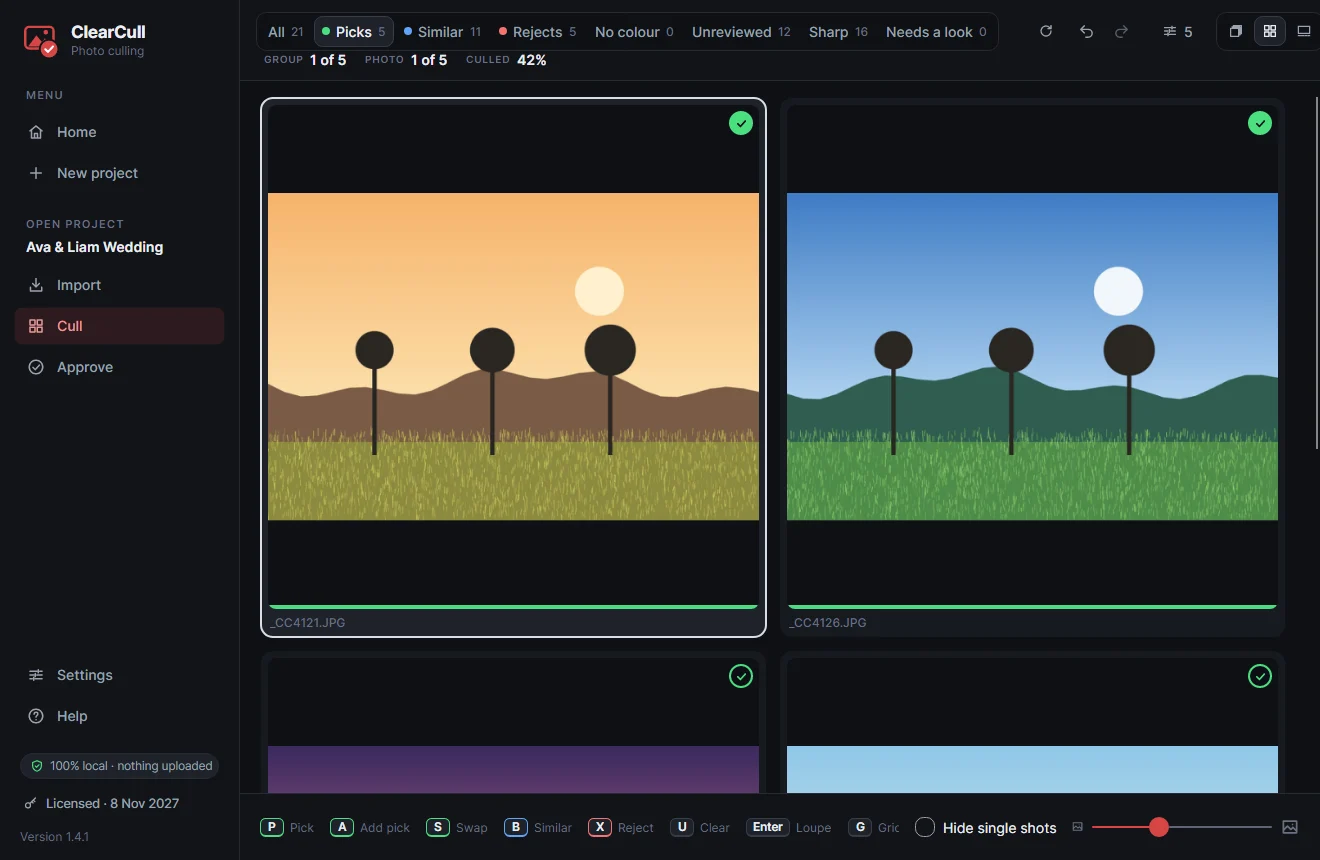
Going through your picks in the grid
At the end, click Picks and press G for the grid. Every tile is the same size and they all grow together: drag the size slider at the bottom right, press + or −, or hold Ctrl and scroll. Big tiles stay sharp, and the size is remembered with the project.
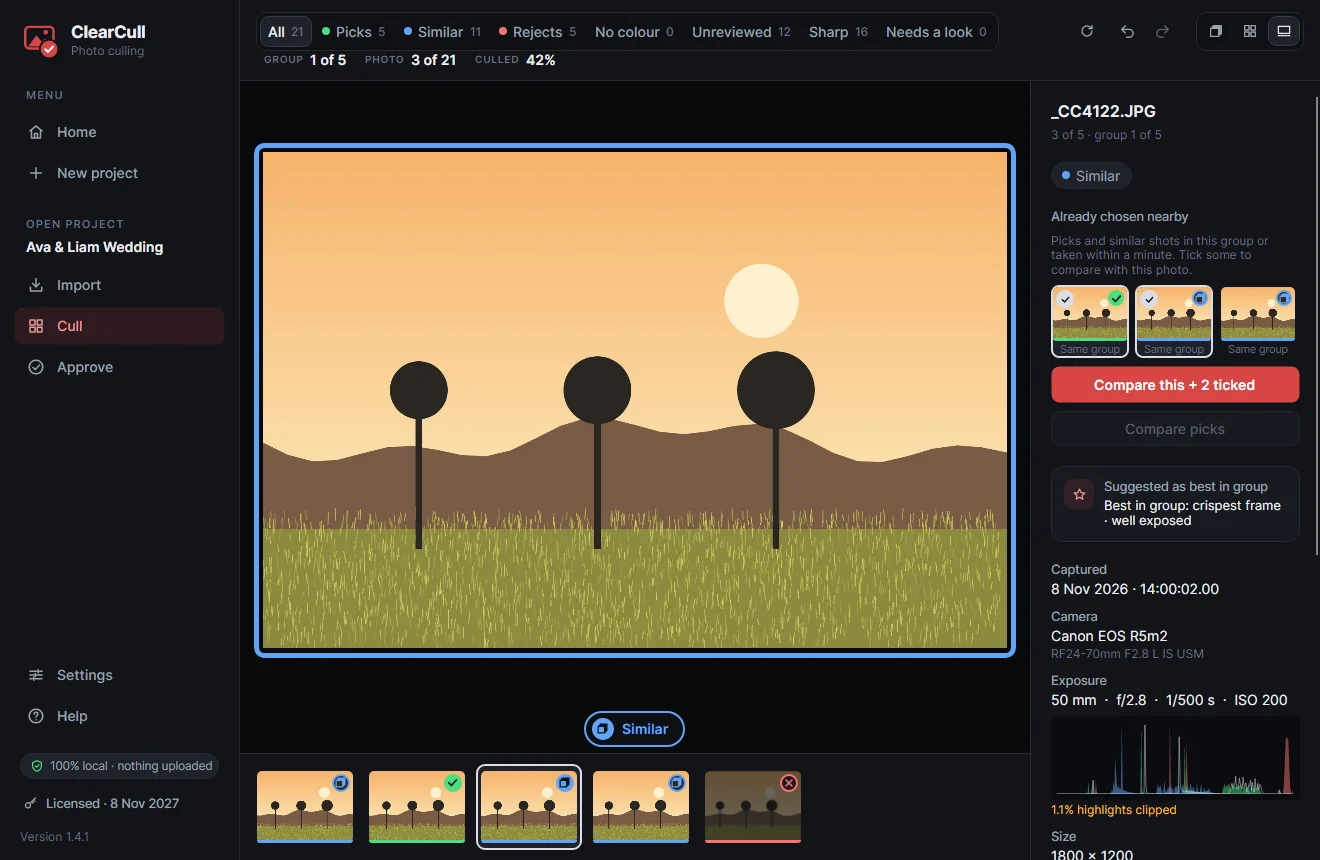
Already chosen nearby, and Compare
Found a lovely frame, but not sure if you’ve already picked a better one? In the large view, Already chosen nearby in the side panel shows the green and blue shots in the same group and in anything taken within a minute of it, whatever filter is on.
Tick one or more of them and click Compare this + ticked: this photo and the ticked ones appear side by side, as large as the window allows. Or click Compare picks to see every pick (green) in the group side by side, handy when you’ve added a few with A and want to narrow them down.
In Compare, click a photo (or use ← →) and colour it with the usual keys. X rejects the photo and takes it out of the grid, and the rest grow to fill the space, so you can narrow a shortlist down to the one you want. Ctrl Z puts the last one back. Esc returns to the photo you started from.
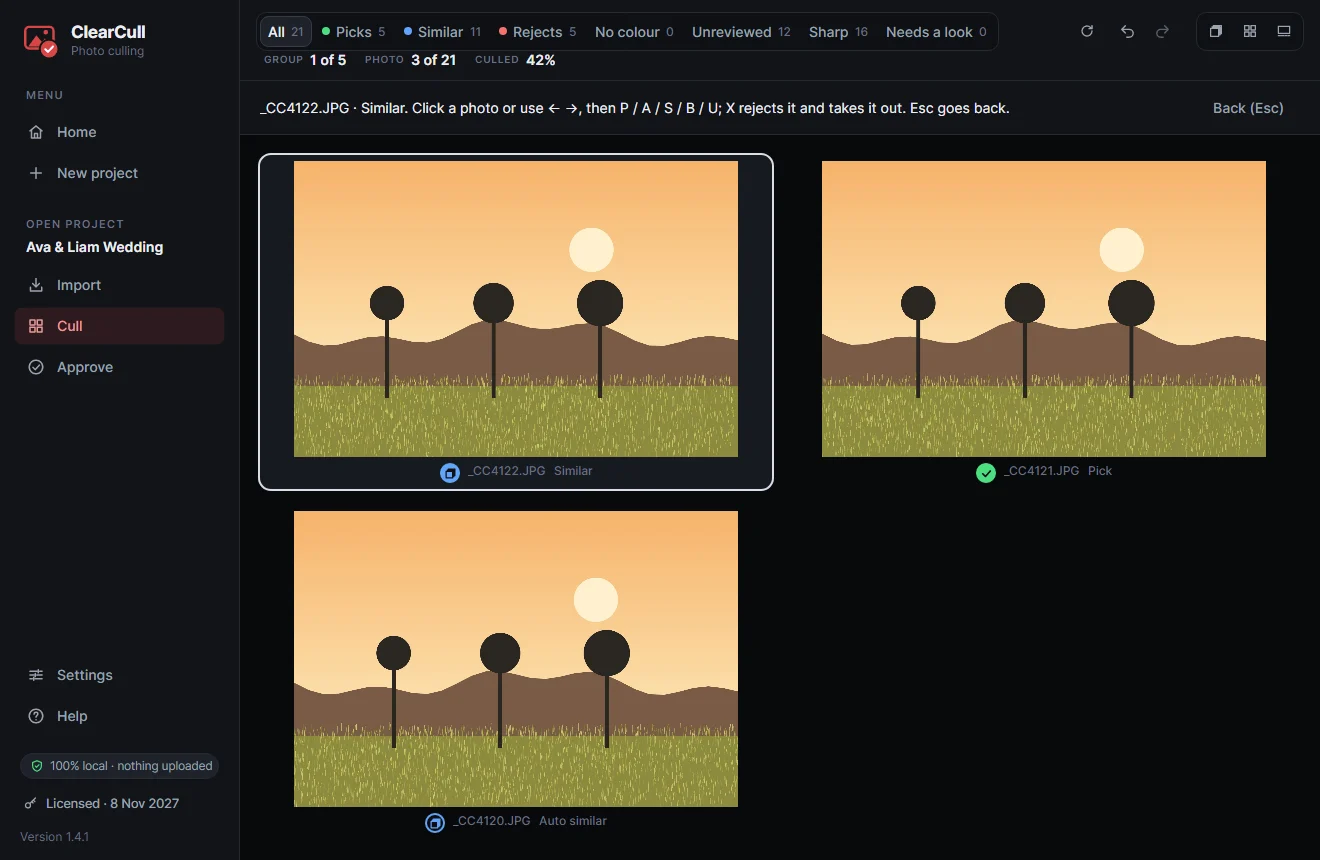
Changed your mind about the whole shoot? Auto cull at the top offers three things:
- Only groups I haven’t touched and Start over re-do the colours, keeping or replacing your own choices. They’re instant, because they reuse the face and sharpness checks made when the photos came in, and Ctrl Z undoes them. A banner says what changed (or that every photo already had the auto cull’s colour).
- Re-check photos looks at every photo again from scratch (faces, sharpness, exposure), just like at import, so it takes a few minutes for a big shoot; progress shows at the top. Use it on a project you started before an update that improved the checks. Your own colours are kept; groups you haven’t touched are recoloured, and a banner says how many changed.
Who matters most: the bride and groom first
At a wedding, a photo is a keeper when the bride is sharp with her eyes open, not because of whoever is standing beside her. Tell ClearCull who matters most and the auto cull judges every photo on them first.
- The first time you open Cull on a shoot with people in it, ClearCull shows Who matters most?: the faces of the people who appear in the most photos.
- Click the bride, then the groom (click a face again to undo it), then Put them first. The auto cull runs again straight away; your own colours are kept, and Ctrl Z undoes it.
- Not in the list? In the large view, right-click their face in the Faces panel and choose This is the bride (or groom). You can pick each from a different photo.
From then on, the bride counts most, then the groom, then everyone else. If the make-up artist or celebrant blinks while the bride is looking at you in focus, that’s still a keeper; if the bride blinks, it isn’t. In the large view they’re labelled under their face ring (a veil for the bride, a bow tie for the groom) and listed first in the Faces panel, and the reasons say how they look (“bride sharp · eyes open”). Change your choice any time from Auto cull ▸ Choose people…, or choose Nobody to have everyone count the same again.
ClearCull recognises faces on your PC, from the photos themselves; nothing is uploaded. It’s very reliable, even side-on, but a face half-hidden or under a veil can occasionally be missed. For other shoots, the two choices are the main person and the second person.
You can close ClearCull at any time: every choice is saved straight away. Each project reopens where you left off: on the same stage (Import, Cull or Approve), photo, view and filters.
4. Approve
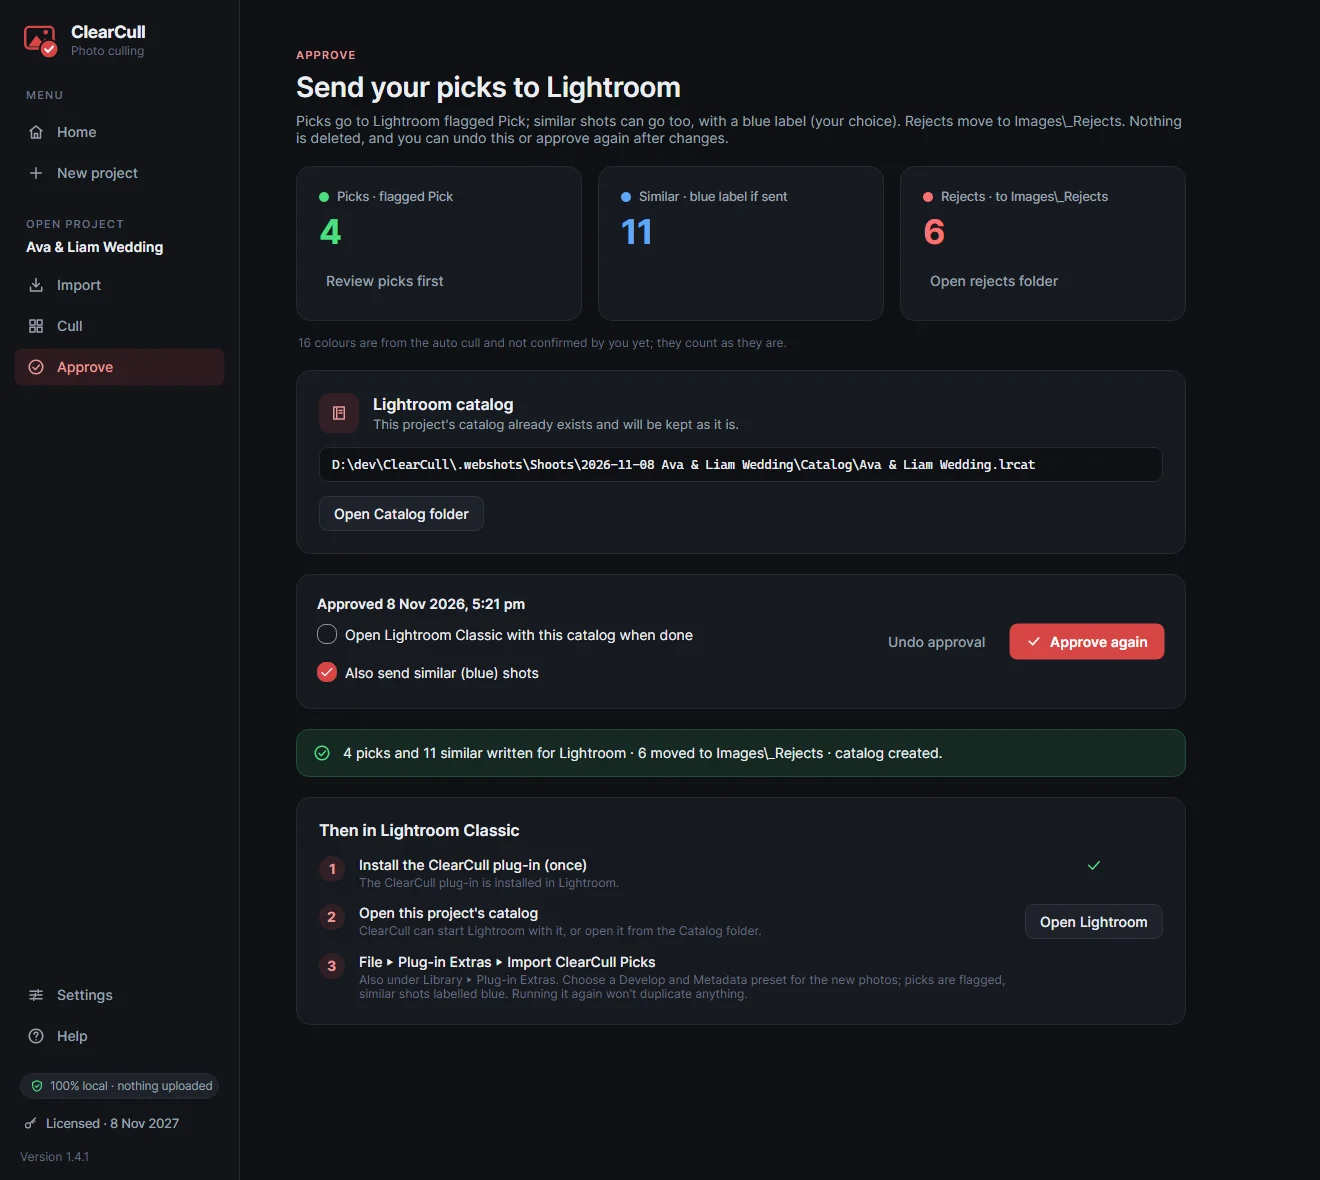
When you’re happy, click Approve in the left-hand menu. The page shows what will happen:
- Picks go to Lightroom flagged as Pick.
- Similar shots go too, with a blue label, if you choose (the first time, ClearCull asks and can remember your answer).
- Rejects move into
Images\_Rejects, keeping their sub-folders and any.xmpfiles. Nothing is deleted. - The project’s Lightroom catalog is made from your template, in the project’s
Catalogfolder.
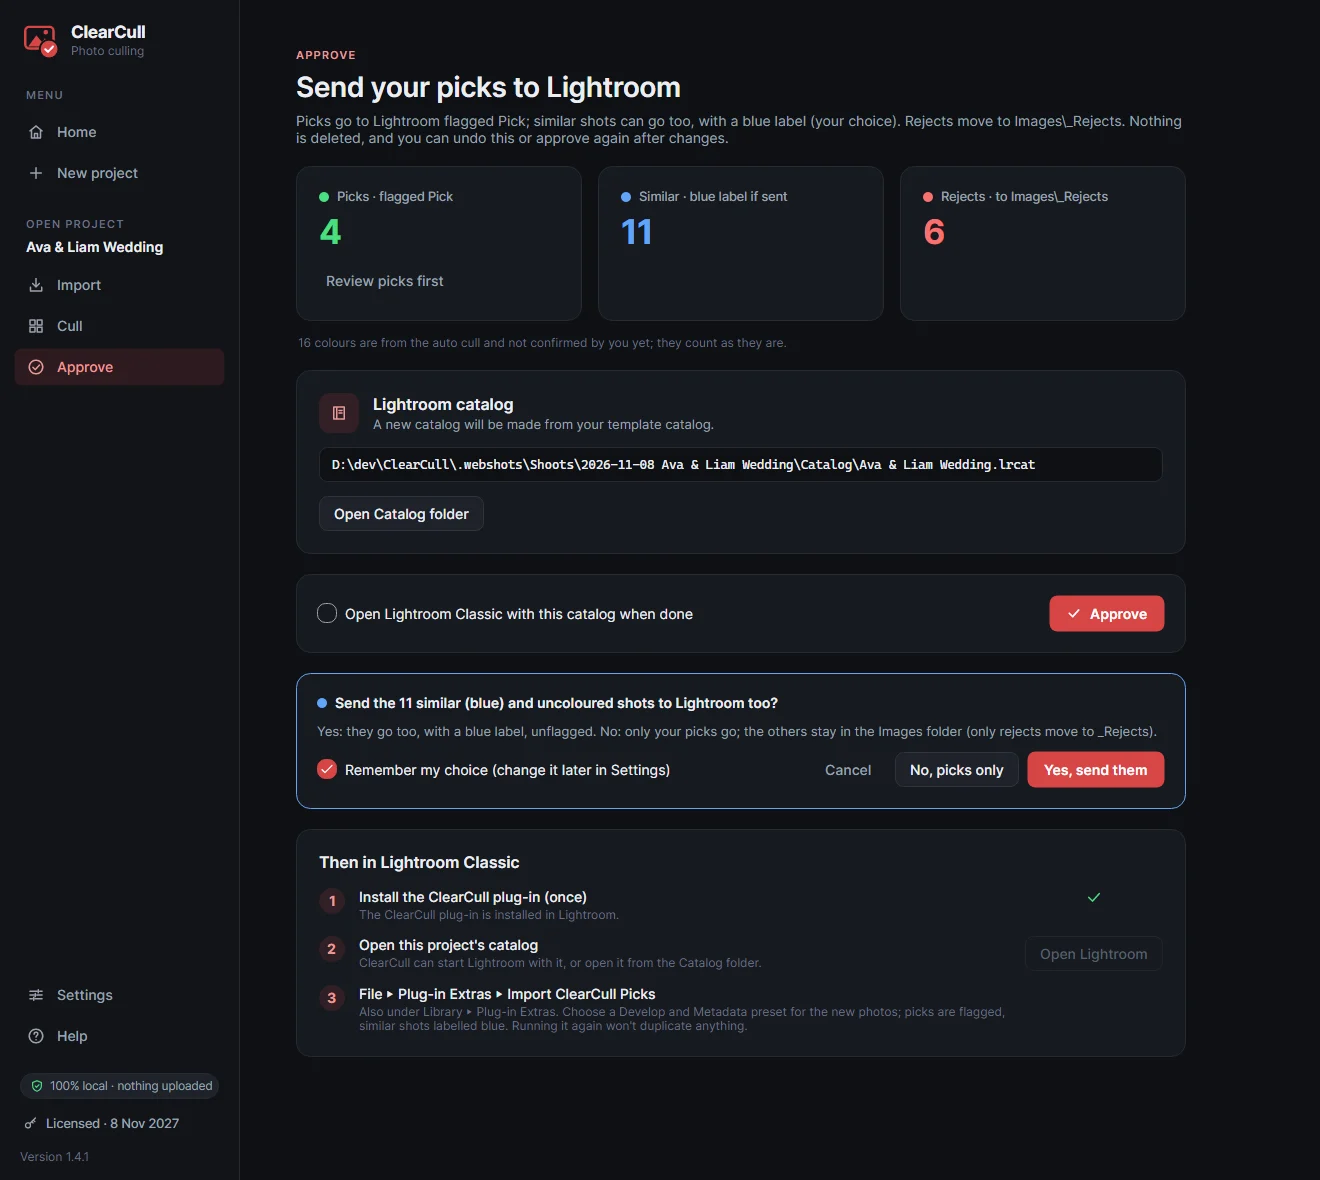
If any group has no pick, Approve stops and lists those groups first, so nothing is missed by accident. Review them opens Cull on the first one; Approve anyway goes ahead (a group can rightly have no keeper).
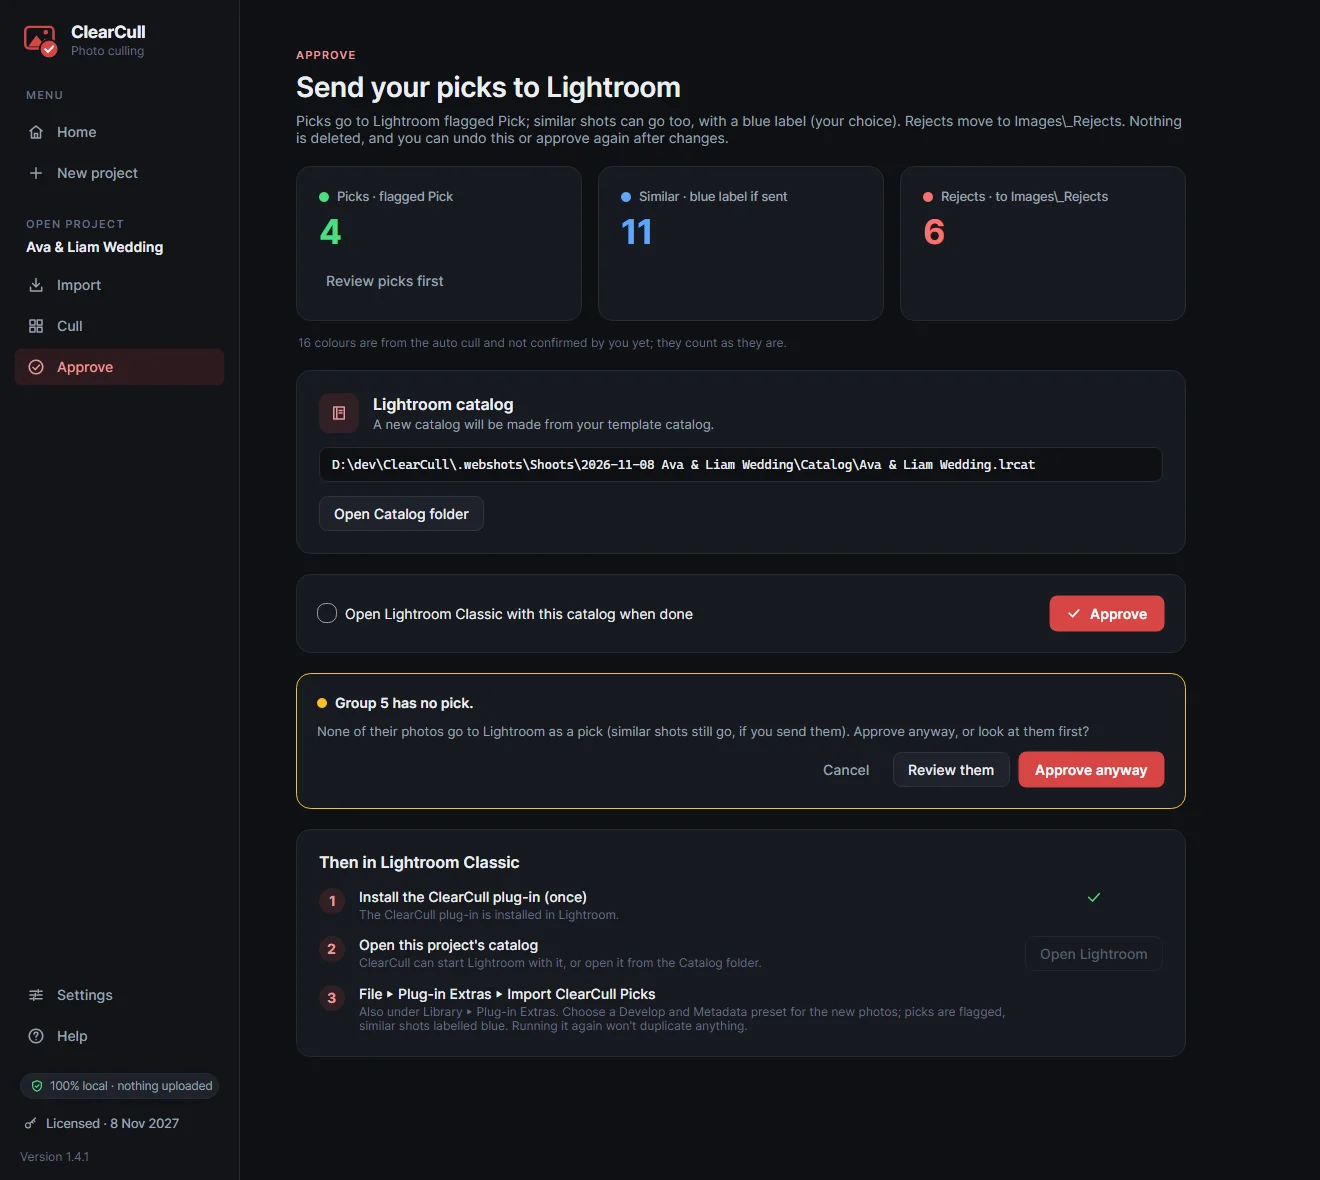
Approving can be undone (Undo approval puts every photo back), and if you change some colours afterwards, Approve again only moves what changed. Tick Open Lightroom Classic with this catalog when done and Lightroom opens the new catalog for you.
5. Import into Lightroom (the plug-in)
This last step happens inside Lightroom Classic. When you approve, ClearCull writes a list of the photos to bring in (a small picks.json file in the project’s hidden .clearcull folder): each photo’s location and whether it’s a pick or similar. It doesn’t touch the Lightroom catalog itself; the ClearCull plug-in inside Lightroom reads that list and does the import.
- Open the project’s catalog in Lightroom Classic: ClearCull can open it for you, or double-click the
.lrcatfile in the project’sCatalogfolder. - Choose File ▸ Plug-in Extras ▸ Import ClearCull Picks (it’s also under Library ▸ Plug-in Extras in the Library module).
- A small window shows what’s coming in (for example “61 photos: 10 picks, 51 similar”) and lets you choose a Develop preset (your usual starting edit) and a Metadata preset (copyright and contact details). It remembers your choice for next time. Click Import.
- The plug-in adds the photos to the catalog where they already are (nothing is copied or moved), flags the picks as Pick, gives the similar shots a blue colour label and applies your presets. A message says how many were added.
In Lightroom afterwards: filter by Flagged to see just your picks, or by the blue label for the alternatives. The rejects aren’t in the catalog at all.
Running it again is safe. Photos already in the catalog aren’t added twice, and your presets only go on photos added in that run, so edits you’ve made since are never overwritten. So if you approve again after changing your mind in ClearCull, just run the import again.
Why a plug-in and not Lightroom’s Import window? Lightroom doesn’t let other programs add photos to a catalog directly, and its Import presets can’t be used by plug-ins. The Develop and Metadata presets cover what an import preset usually does.
Adding more photos later
Approving isn’t final. Once the catalog is made and your picks are in Lightroom, you can go back to ClearCull, choose more (or fewer) photos, and send the difference to the same catalog. Handy when a client asks for extra shots, or when you spot a frame you missed while editing.
- Open the project in ClearCull and go to Cull. Change the colours: turn more photos green (A adds another pick to a group), or blue if you send similar shots. Your earlier rejects are still there, in
Images\_Rejects, so you can change your mind about them too. - Go to Approve and click Approve again. Only what changed is moved: photos you’ve now picked come back out of
_Rejects, and the list for Lightroom is updated. The catalog you already have is kept exactly as it is. - In Lightroom Classic, with the project’s catalog open, run File ▸ Plug-in Extras ▸ Import ClearCull Picks again. It adds only the photos that aren’t in the catalog yet and flags the new picks.
Your editing is safe. Photos already in the catalog aren’t added twice, and the Develop and Metadata presets only go on the photos added in that run, so edits you’ve made since the first import are never overwritten.
Taking photos out works differently. The plug-in never removes anything from the catalog. If you’ve changed your mind about a photo that’s already in Lightroom, it’s simplest to unflag it (or remove it) in Lightroom. If you turn it red in ClearCull instead, Approve again moves its file into _Rejects, so Lightroom shows it as missing: remove it from the catalog there.
Keyboard shortcuts
| P | Pick: makes this the only pick (green) in its group. Any other pick there turns blue. |
|---|---|
| A | Add another pick in the same group. |
| S | Swap with the group’s pick: this one turns green and the old pick takes this one’s colour. |
| B | Similar (blue): a good frame, but not the one. |
| X | Reject (red): moved aside to Images\_Rejects when you approve. In Compare, it also takes the photo out of the grid. |
| Shift X | Reject the whole group (test shots, a burst that didn’t work) and go to the next group. One Ctrl Z undoes it. |
| U | Clear the colour. |
| ← → | Previous / next photo (runs on into the next group). In Compare, moves between the photos. |
| ↑ ↓ | Previous / next group (rows in the grid). |
| Home / End | First / last photo of the group. With Ctrl: the start / end of the whole shoot. |
| Ctrl → / Ctrl ← | Jump to the group’s pick (with several picks, the next or previous one). |
| + / − | Bigger / smaller tiles in the groups and grid (or hold Ctrl and scroll). |
| Enter | Open the photo large (the loupe). Esc goes back. |
| Esc | Back from the large view, or from Compare to the photo you were on. |
| Z | Zoom to 100% (or click the photo). |
| F | Show or hide the face rings. |
| G | Switch between groups and the plain grid. |
| Ctrl Z / Ctrl Y | Undo / redo. In Compare, Ctrl Z also puts back a photo X took out. |
Questions and problems
I can’t see “Import ClearCull Picks” in Lightroom
Restart Lightroom Classic: it only looks for plug-ins when it starts. Then check File ▸ Plug-in Manager…: ClearCull should be listed as installed and running. If it isn’t there, open ClearCull’s Approve page and click Install plug-in, then restart Lightroom again.
The plug-in asks me to find picks.json
It looks for the list next to the catalog ClearCull made. If you opened a different catalog (or made one yourself in another folder), choose picks.json in the project’s .clearcull folder. It’s hidden, so in the file window type the project folder’s path followed by \.clearcull.
Some files “weren’t found”
The photos were moved or renamed after approving. Approve again in ClearCull (it updates the list) and run the import again.
Auto cull says “nothing to change”
Every photo already has the colour the auto cull would give it. That’s normal on a shoot you haven’t changed: the auto cull ranks the checks made when the photos came in, so it comes out the same each time. To look at the photos again from scratch, use Auto cull ▸ Re-check photos.
Too many (or too few) shots are blue
Blue means “good, but not the best in its group”. In Settings, a project type’s sharpness bands set how strict ClearCull is for new projects of that type (each project keeps the settings it was created with), and the grouping settings (on the Cull page, next to the group count) set how alike shots must be to count as one group. You can also leave blue shots out of Lightroom entirely: Settings ▸ Similar (blue) shots at approval ▸ Picks only.
Where are my photos and decisions kept?
Photos stay in the project’s Images folder (rejects in Images\_Rejects). Your colours and ClearCull’s analysis are in the project’s hidden .clearcull folder, so the project can be moved or backed up as one folder. Nothing is ever uploaded.
Something went wrong
ClearCull keeps a log of problems. Use the Open log folder button on its error message, or open %APPDATA%\ClearCull\logs, and send the latest file with your question below.
Still stuck?
Send a message below, or email [email protected] (screenshots and log files welcome), and we’ll get back to you. It helps to say which version you have (it’s at the bottom left of ClearCull) and what you were doing.